
Elektrik
Schaltpläne Beleuchtung Ladetechnik DC/DC Car Controller Battman Motor Steller Messgeräte Sicherungen Schalter Schütze Normen Intervall Wischer
Anschlüsse Funktionsweise mehr Infos
Kontakt Suche Sitemap Impressum Datenschutzerklärung
mehr Infos
CarController vom 4 und 5er Kewet
Im original englisch gelassen,
Quelle: www.aspenberg.info/kewet/resetcc.html
The Car controller does normally a quite good job of supervising the batteries. The algorithm is quite simple: The efficiency of each pair is monitored during use and recharge. The weakest pair is then used to calculate the overall performance as shown in this service report:
Capacity new battery 116.8 Amp hours C5
Capacity available 105.8 Amp hours C5
Capacity at display 100 %
Capacity discharged 0.0 Amp hours
Temperatur battery 16 Degress Centigrade
Current - 0.4 Amperes
Battery no: Voltage: Efficiency min. 70%
Battery 1-2 13.87 volt 90 %
Battery 3-4 13.93 volt 91 %
Battery 5-6 13.89 volt 90 %
Battery 7-8 13.87 volt 91 %
Battery 9-10 13.87 volt 91 %
Battery 11-12 13.85 volt 91 %
The capacity of new a pair of new Hawker RGT is stipulated to 116.8 Ah. As you can probably guess 105.8 Ah is 90% of that. A set of RGTs in exellent condition will have 140-160% efficiency, or be worth about 175Ah on a sunny day. Anything less than 70% is .. doubtful. The car controller doesn't measure below 60%. Getting 105Ah from my NiCads should be considered as rather good. After all they're rated for 100Ah. I'll hope it will last...
You should be a bit concerned if one pair shows a tendency of beeing considerable weaker than the rest. All experience shows that this is an early warning for the entire set is due for replacement. Some easy tricks can postpone the unavoidable for a while – but just for a while. Start saving now!
Proper cycling may sometimes revive the weak pair – for a while – and the trick to do first is to reset the car controller fooling it to believe it is supervising a fresh set of batteries.
Resetting model 5 car controllers:

Resetting model 5 car controllers:
This procedure do only work for the car controllers found in the CityJet5. Older car contollers as the ones found in model 4 and some 3's needs a special firmware EPROM to have their counters reset. See below.
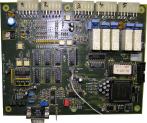
1. Locate the Car controller. When sitting in the car, its behind the panel you have around your left knee. Just tear it off – it's velcroed in place.
2. Dismount the car controller from the chassis by removing the two M8 self threading screws.
3. Remove the leftmost cable (marked P1 on some vehicles) by pressing in the latch in the middle of the connector. Do not use force!
4. Open the lid by removing the recessed philips screws around the edges.
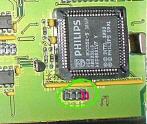
5. Inspect the printed circiut board and look for the jumper field S6..S9:
6. Now insert jumpers over position S8 and S9 as shown in red.
7. Without putting on the lid, reinsert the cable P1.
8. Turn on the ignition. At this point nothing should turn up in the display but you should hear relays clicking in the back of the car. No panic. This is quite normal.
9. Turn off the ignition and remove P1 again.
10. Remove the jumpers and reinsert P1 and turn on the ignition to verify that everything is OK.
11. Print a service report to verify that all batteries now show 100%.
12. You are done. Put back the lid and put the car controller back in its recess.
Resetting model 3 and 4 car controllers
Resetting model 3 and 4 car controllers:
Older controllers as found in model 4 and some 3's needs a special EPROM in order to have the counters reset. This firmware can be downloaded from the link below. The file contains a binary image that can be burned onto most 27C256 chips (180ns or faster) as the M27C256B.
»Firmware for resetting model 3 and 4 car controllers. [ KB]
To use it, do as follows:
1. Locate the Car controller. When sitting in the car, its behind the panel you have around your left knee. Just tear it off – it's velcroed in place.
2. Loosen the car controller from the chassis by removing the two 8mm self threading screws.
3. Remove the leftmost cable (marked P1 on some vehicles) by pressing in the latch in the middle of the connector. Do not use force!
4. Carefully remove the original firmware EPROM and insert the erase EPROM. Make sure that it is firmly seated in the correct orientation and no pins are bent or broken.
5. Reinstall the connector P1 and turn on the ignition. Wait a bit, then turn the iginiton off again.
6. Remove P1 (again), remove the erase EPROM and reinstall the firmware EPROM. Again, make sure that it is firmly seated and no pins are bent or broken.
7. Reinsert P1 (again) and turn on the ignition to check if everything is OK. Then print a service report to verify that all batteries now show 100%. All counters for "put to charge" etc. should read zero.
8. You are done. Remount the lid and put the car controller back in its place.
Service Report
The service report shows the current battery status as well as some less important information:
****************************************************
*
* KEWET El-Jet 5
* Service Report
*
****************************************************
Software version 3.06
Miliage recorder 4rÁ94 Km
Amp.hours recorder 7r¿88 Amp hours
Set to charging 2530 [Times]
Charging finished 1548 [Times]
Misuse 72 [Times]
Battery data:
Capacity new battery 116.8 Amp hours C5
Capacity available 105.8 Amp hours C5
Capacity at display 100 %
Capacity discharged 0.0 Amp hours
Temperatur battery 16 Degress Centigrade
Current - 0.4 Amperes
Battery no: Voltage: Efficiency min. 70%
Battery 1-2 13.87 volt 90 %
Battery 3-4 13.93 volt 91 %
Battery 5-6 13.89 volt 90 %
Battery 7-8 13.87 volt 91 %
Battery 9-10 13.87 volt 91 %
Battery 11-12 13.85 volt 91 %
12 volt battery 14.22 volt
Car no. the last 3 digits in the vincode _________
The battery efficiency is perhaps the most important piece of information. The sample shows a set of quite healthy NiCad batteries as the batteries are nominially rated for 100Ah. As you can see the mileage and the ampere hours conters shows garbled data. My experience is that this doesn't matter – it's just annoying.
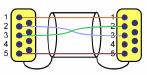
How to obtain this data? You'll need a portable PC equipped with a terminal emulator program (as Hyperterm, ZOC or whatever) and a simple serial cable made like this:
 |
 |
 |
Both ends are ordinary female 9-pin D-sub plugs. Connect pin 1 to pin 1, cross pin 2 and 3 both ways, then connect pin 5 to pin 5. Optionally use the shield in the cable to connect the shields of the plugs.
Connect the cable to the 9 pin serial port on the car controller, then insert the other end in your PC. Set up your terminal program to 9600 baud, no parity, 8 data bits 1 stop bit, XON/XOFF handshake and make sure that you're listening on the correct port; COM1, COM2 or whatever.
To obtain the data turn off the ignition, then press the TRIP COUNTER RESET button in the middle on the dashboard. (There is a push-button on the car controller itself on some older models.) A similar listing to what shown above should appear on your PC. It's quite handy to keep logs of this: Use the terminal program's logging facility to log the listing to a text file.
A Palm III, V or Vx or any Palm compatible device with a serial port can also be used. Devicing your own cable can be a bit tricky due to the special connectors on the Palm but the cable issed with the Palm Travelling Kit (product #10413U for the Palm V/Vx) works perfectly.